News & Views
Interview with EOS Magazine (April 2015 issue)
 1) What are you personally trying to achieve when photographing wildlife?
For myself, it’s probably a matter of trying to capture accurately a moment or some detail that I can study and fully appreciate at leisure later on. I also relish the creative aspects that involve an interpretation of what I witnessed and my personal input. However, I also hope my photographs will be viewed by others and, in this regard, it’s also about some measure of education and opening of eyes to the beauty and complexity of the natural world and its vulnerability in the face of our current excesses.
2) In terms of getting a pleasing shot, how much is due to field craft and knowledge of your subject, how much is down to having the right gear, and how much is down to luck?
Good question! I wish I could give a simple answer like it’s 30% field craft and knowledge, 40% gear and 30% luck, but it doesn’t work like that. The proportions will depend on the situation. There are times you can get a very pleasing shot by simply stumbling across something spectacular. I guess you could argue that, all else being equal, it would be more satisfying if the image were a product of at least some of your hard work rather than being totally down to chance. In most situations it involves a measure of each and this in itself is satisfying – it’s like you and Nature are working together. It involves an acceptance that ultimately we aren’t in control. Certainly better equipment can help us with the quality of the resulting photograph and in most cases can facilitate its capture. However, you can also envisage a situation when perhaps having a small compact camera might enable you to catch a fleeting event that you would miss if working with heavy, complex equipment mounted on a tripod. That doesn’t mean to say I would trade in my gear for a budget compact camera though!
 3) Is wildlife photography about waiting for the right light and right moment or grabbing what you can, when you can? Have you ever been surprised by getting great results even when conditions seem stacked against you?
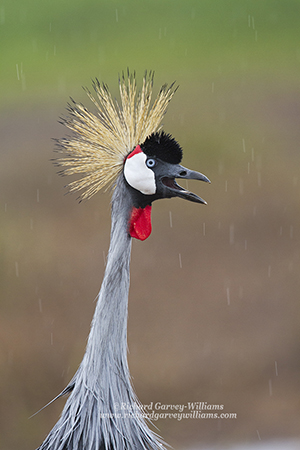
In this book I certainly advocate getting out there even in what appear to be poor conditions. As with landscape photography, a proportion of dramatic and original wildlife imagery derives from inclement weather conditions. Particularly when you are looking to depict an animal in the context of its environment, rain and snow, for example, might help complete the narrative or dramatic cloud formations might add some mood. I recall a game drive in Kenya’s Amboseli National Park recently. We went out that morning in the greyest, ‘flattest’ light conceivable with steady rain. I nearly didn’t bother getting the camera out of the bag, but it actually turned out to be a relatively productive morning. In particular, a pair of Crowned Cranes posed nicely alongside the vehicle for some detailed portraits revealing the details and colours of their beautiful head adornments (see attached file CrownedCrane). Soft lighting is often an advantage in this regard, and the visible streaks of falling rain drops in this situation added that little something to the images. So, although for much of our work it’s worth doing some research to try to time our excursions to ensure a good chance of that bold, warm, oblique lighting that we all love so much, it’s also worth occasionally breaking the rule and being open-minded.
4) You're on safari, being driven around in a 4x4 and the sun is getting high in the sky. What advice can you give to getting pleasing shots in such restrictive situations and unfavourable lighting?
Yes, we’re usually heading back to the camp for a very late breakfast at this point! However, there’s still work to be done. A polarizing filter is certainly one thing worth considering. Attaching one can often revitalize a scene in these circumstances. They serve to reduce atmospheric haze, adding clarity to your shots. They can also provide deep blue skies and increase color saturation of foliage by decreasing reflections from waxy leaves. Polarizers work best when shooting at 90 degrees to the sun so actually work well in most directions when the sun is high in the sky.
You could also look out for simpler, more graphic compositions that depend more on the shapes of a few elements than on detail, colours and textures.
5) Photographers complain that they need the big, expensive lenses for wildlife photography. To what extent is this true?
As we’ve seen, gear is only one of the factors that can affect the potency of our photographs. Big, quality lenses can certainly help though, particularly in producing professional quality images. Longer lenses provide more reach, of course, enabling frame-filling shots of smaller and more distant subjects. The larger maximum apertures can facilitate the autofocus and tracking systems – an advantage when capturing the action. They also provide for narrower depths of field and thus more blurred backgrounds, which often helps remove any distractions. Furthermore, the more expensive ones will generally have much better optics, providing sharper images relatively free of aberrations. Having said this, I’d rather look through the images taken by a good photographer using shorter, cheaper lenses than those of a poor photographer using the most impressive of gear. So, I recommend to people starting out that they focus on the fundamentals of photography and work with simpler, lighter lenses if they are more comfortable with them, rather than getting too hung-up on big lenses. Bigger lenses are a considerable expense and it’s often better to build up to them through your development as a photographer. After all, unless you are exhibiting your photographs as massive prints in a gallery, you can usually get away with fairly substantial cropping, and careful choice of viewing angle will give you a cleaner, more blurred background.
 6) What lenses would you recommend for someone going on wildlife safari in Africa for the first time on a middle-of-the-road budget?
Certainly for the mammals I would recommend aiming to cover as much of the 150 to 400mm focal length range as possible. If your camera has an APS-C sensor, you multiply this by 1.6 to get the effective focal length. Thus 400mm would equate to 640mm – more than enough for most situations. On the rare occasions where your subjects are very far off and for the birdlife a little cropping will still yield relatively tight images. Thus, in addition to your kit lens, which can be used when you want to take in the broader scene, I’d recommend a telephoto zoom for versatility. The EF 100-400mm f/4.5-5.6 L IS II USM Lens is an excellent option. Its predecessor is still available at almost half its price and is still a quality lens. I started out myself using the EF 70-300mm f/4-5.6 IS USM, which is another good value lens for those budgeting for less.
7) What other essential accessory (photographic or otherwise)?
Probably the most essential, when photographing from a vehicle using telephoto lenses is the humble beanbag. As already mentioned, a polarizing filter can also prove very useful, and, of course, a blower brush and lens cleaning cloth and fluid as dust can be a problem.
8) What country/location have you had most success in photographing wildlife? And where would you recommend (may or may not be the same place).
Unfortunately, I can’t speak for most of the globe as I have yet to reach many countries and indeed some continents. Anyone reading the book will see that a fair proportion of the images emanate from Africa. I was brought up in East Africa and developed a passion for its wildlife and return there now as often as possible leading photographic safaris. Putting this bias aside, I firmly believe that, in terms of the plethora, wonders and diversities of its wildlife and also the opportunities we as photographers now have to get ourselves into good positions and witness natural behaviour, an African photographic safari takes some beating.
As wildlife photographers we also have to acknowledge that we are likely to achieve good results by focusing on the wildlife local to where we live. Here we have the advantage of being able to get really familiar with its features and to return time and time again until we get things right.
9) Outline your workflow ie: RAW and/or JPEG, card sizes, downloading, back up, deleting.
I almost always shoot in RAW and tend to favour intermediate-sized memory cards of 8-16Gb. I’ve actually never had a card fail on me, but still prefer to use these sizes rather than the larger ones now available. I find that there’s still plenty of space on them for the majority of shoots. When on a trip, I download the images onto a laptop and also back them up onto a portable external hard-drive - I try to keep the latter on me for safe-keeping when I go for meals or on shoots. Only then will I reformat the cards. If I have time, I’ll go through them quickly using the Quick Check mode in Digital Photo Professional and delete only those I’m sure aren’t worth keeping. I’ll also copy what I think are the very best onto a memory stick, which I keep in my pocket as a precaution against the worst-case scenarios! Renaming and further editing is usually done back at base.
 10) Your views on using photo editing software for wildlife images
Vision is a perceptual process involving our brains as well as our eyes. So, a measure of processing is actually necessary to make the image more akin to what we actually ‘saw’. However, most of us that appreciate and enjoy wildlife images believe that Nature has already done a pretty good job of perfecting the colours and textures of our subjects. So, we need to be careful not to over-do the processing, particularly in terms of contrast and saturation adjustments that could over-cook the colours. There are still some competitions that, quite rightly in my mind, do not allow radical processing and in particular the removal of significant elements or the introduction of items from other image files. The only way of policing this is to see the original RAW file, so certainly keep your .CR2 files if you plan to enter these. Beyond these, in the context of photography being an art-form, I personally have no problem with more radical adjustments provided that they are skillfully performed so that they are not discernible. It would be nice to think that the photographer would be open about having applied them too.
11) List your kit bag
Typically when going on an extended trip, my back-pack might contain:
Canon EOS 5D Mk III.
Canon EOS 7D.
EF 24-105mm f/4 L IS USM Lens.
EF 100-400mm f/4.5-5.6 L IS USM Lens.
EF 500mm f/4 L IS USM Lens.
EF 1.4x Extender.
Speedlite 430EX Flashgun.
I might also include a 105mm macro lens and MT-24 EX Macro Twin Lite if there are likely to be opportunities for macro photography.
I also take a few filters including polarizers to fit the various lenses, a beanbag and tripod with either a ball and socket or bracket head. A remote shutter release, spare batteries, lens-cleaning accessories and memory cards fill the smaller pockets.
This range of bodies and lenses has worked well for me and I don’t think I would want to change things other than upgrade to the newer models of 7D, 100-400mm and 500mm lenses. Somewhere along the line it would be nice to also stretch to the EF 300mm f/2.8 L IS II USM Lens.