Tutorials
Focus Stacking
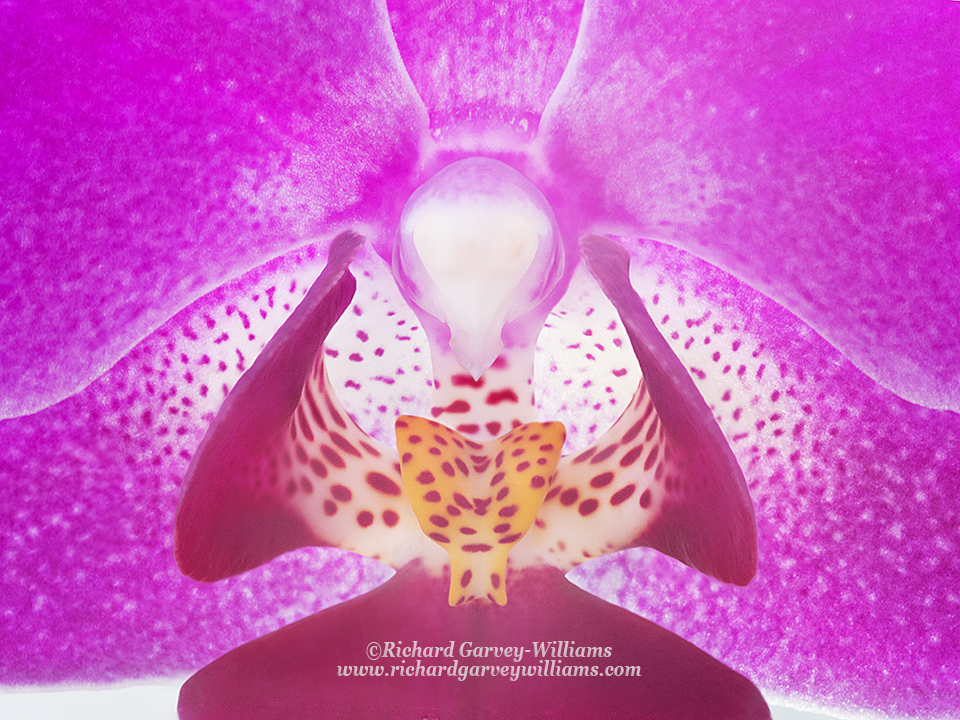
With this beautiful orchid, the real point of interest was in the central part of the flower that to me looks like an open mouth with a speckled tongue but also like a dove’s head framed by its raised wings. However, to get a pleasing angle of view to reveal these in their best light involved also including the curled tips of the petal extending towards us. These were probably 7 or 8mm in front of the next features of importance, and in macro photography even f/20 wouldn’t have enabled sufficient depth of field to render these in good focus together with the rest of the flower.
I therefore framed the shot as I wanted it, allowing a little extra room. This is because as you change the point of focus the image also undergoes a little distortion due to the altered position of the lens relative to the sensor and the subject. The software attempts to adjust for this when it aligns the various shots but you will invariably need to crop the final blended version slightly due to artifacts in the peripheries. You can also buy little 'runner' mechanisms to go on your tripod. These enable you to move your camera in a very controlled way towards your subject by simply turning a dial. A handy accessory if you do a lot of macro work on a tripod.
I then worked out what exposure I would require and set an aperture of f/14, which I knew would give good sharpness and a reasonable depth of field with the lens I was using. From past experience, I know that it is important to ensure that the in-focus parts of each successive exposure overlap significantly. Otherwise you’ll end up with patches in the image where none of the sequence had them in good focus. These slightly fuzzy parts, even if small and not in important parts of the image, tend to stand out like sore thumbs. In this case I initially focused on the nearest part of the flower and then took each subsequent shot at a focus point about 2mm further into the flower with the last being just beyond the ‘speckled tongue’. Another reason to take plenty of shots with only very slightly differing planes of focus is that the blurred edges of nearer, out-of-focus elements will spill over to obscure parts of the sharper parts beyond and potentially preventing the recording of a sharp version of those parts in the series.
It’s obviously important that the images match each other in terms of white balance and exposure if possible, so you may opt to use a preset for white balance on the camera. Try to take them all under the same lighting conditions too. If shooting in Raw, you can batch process them in your Raw converter. I then used Photoshop to merge them following this procedure:
1. Load all images and stack them as layers into 1 file (in Bridge go to Tools>Photoshop>Load Files into Photoshop Layers).
2. Make sure the Layers Palette is open and in it you then shift (hold capitals key whilst clicking) click on the top and bottom layers to select all the layers.
3. Then go to Edit>Auto>Align Layers. Choose Auto and then OK. NB if you want to align the layers so that they snap to one specific layer, lock it by clicking on the padlock icon in the Layers palette.
4. Then Edit>Auto Blend Layers – merges the sharpest parts of each. Select the Stack Images and Seamless tones and colours options.
Invariably the software is likely to make one or two small mistakes so scan the image for patches that aren’t in good focus. You can usually correct these by using layer masks to selectively bring back the focused part from the relevant layer. I did this fine-tuning by:
1. Merge all the layers into another new layer by Cmd/Ctrl-Alt-Shift-E. Then delete all layer masks for the layers below (drag them to the trash bin and opt not to apply them).
2. Then compare this new, merged layer to each of the layers below by only making these two visible. Add a new mask to the combined layer if the combined layer has a part that isn’t in as good focus as the layer below. Paint black on it to bring the detail back from the other layer.
3. Merge each of the 2 visible layers after each is checked and repeat for each of the other layers.
It is possible that your focus overlaps between exposures weren’t adequate and you may need to go back and try again.
Helicon Focus is another software package that does this and allows for the retouching. I’ve not tried it.
All in all, it can be rather time-consuming but can be well worth it so why not give it a go?